0 基本理论
I/O简而言之,就是输入输出,比如读取硬盘上的文件,网络文件传输,鼠标键盘输入,也可以是接受单片机发回的数据,而能够支持这些操作的设备就是I/O设备。
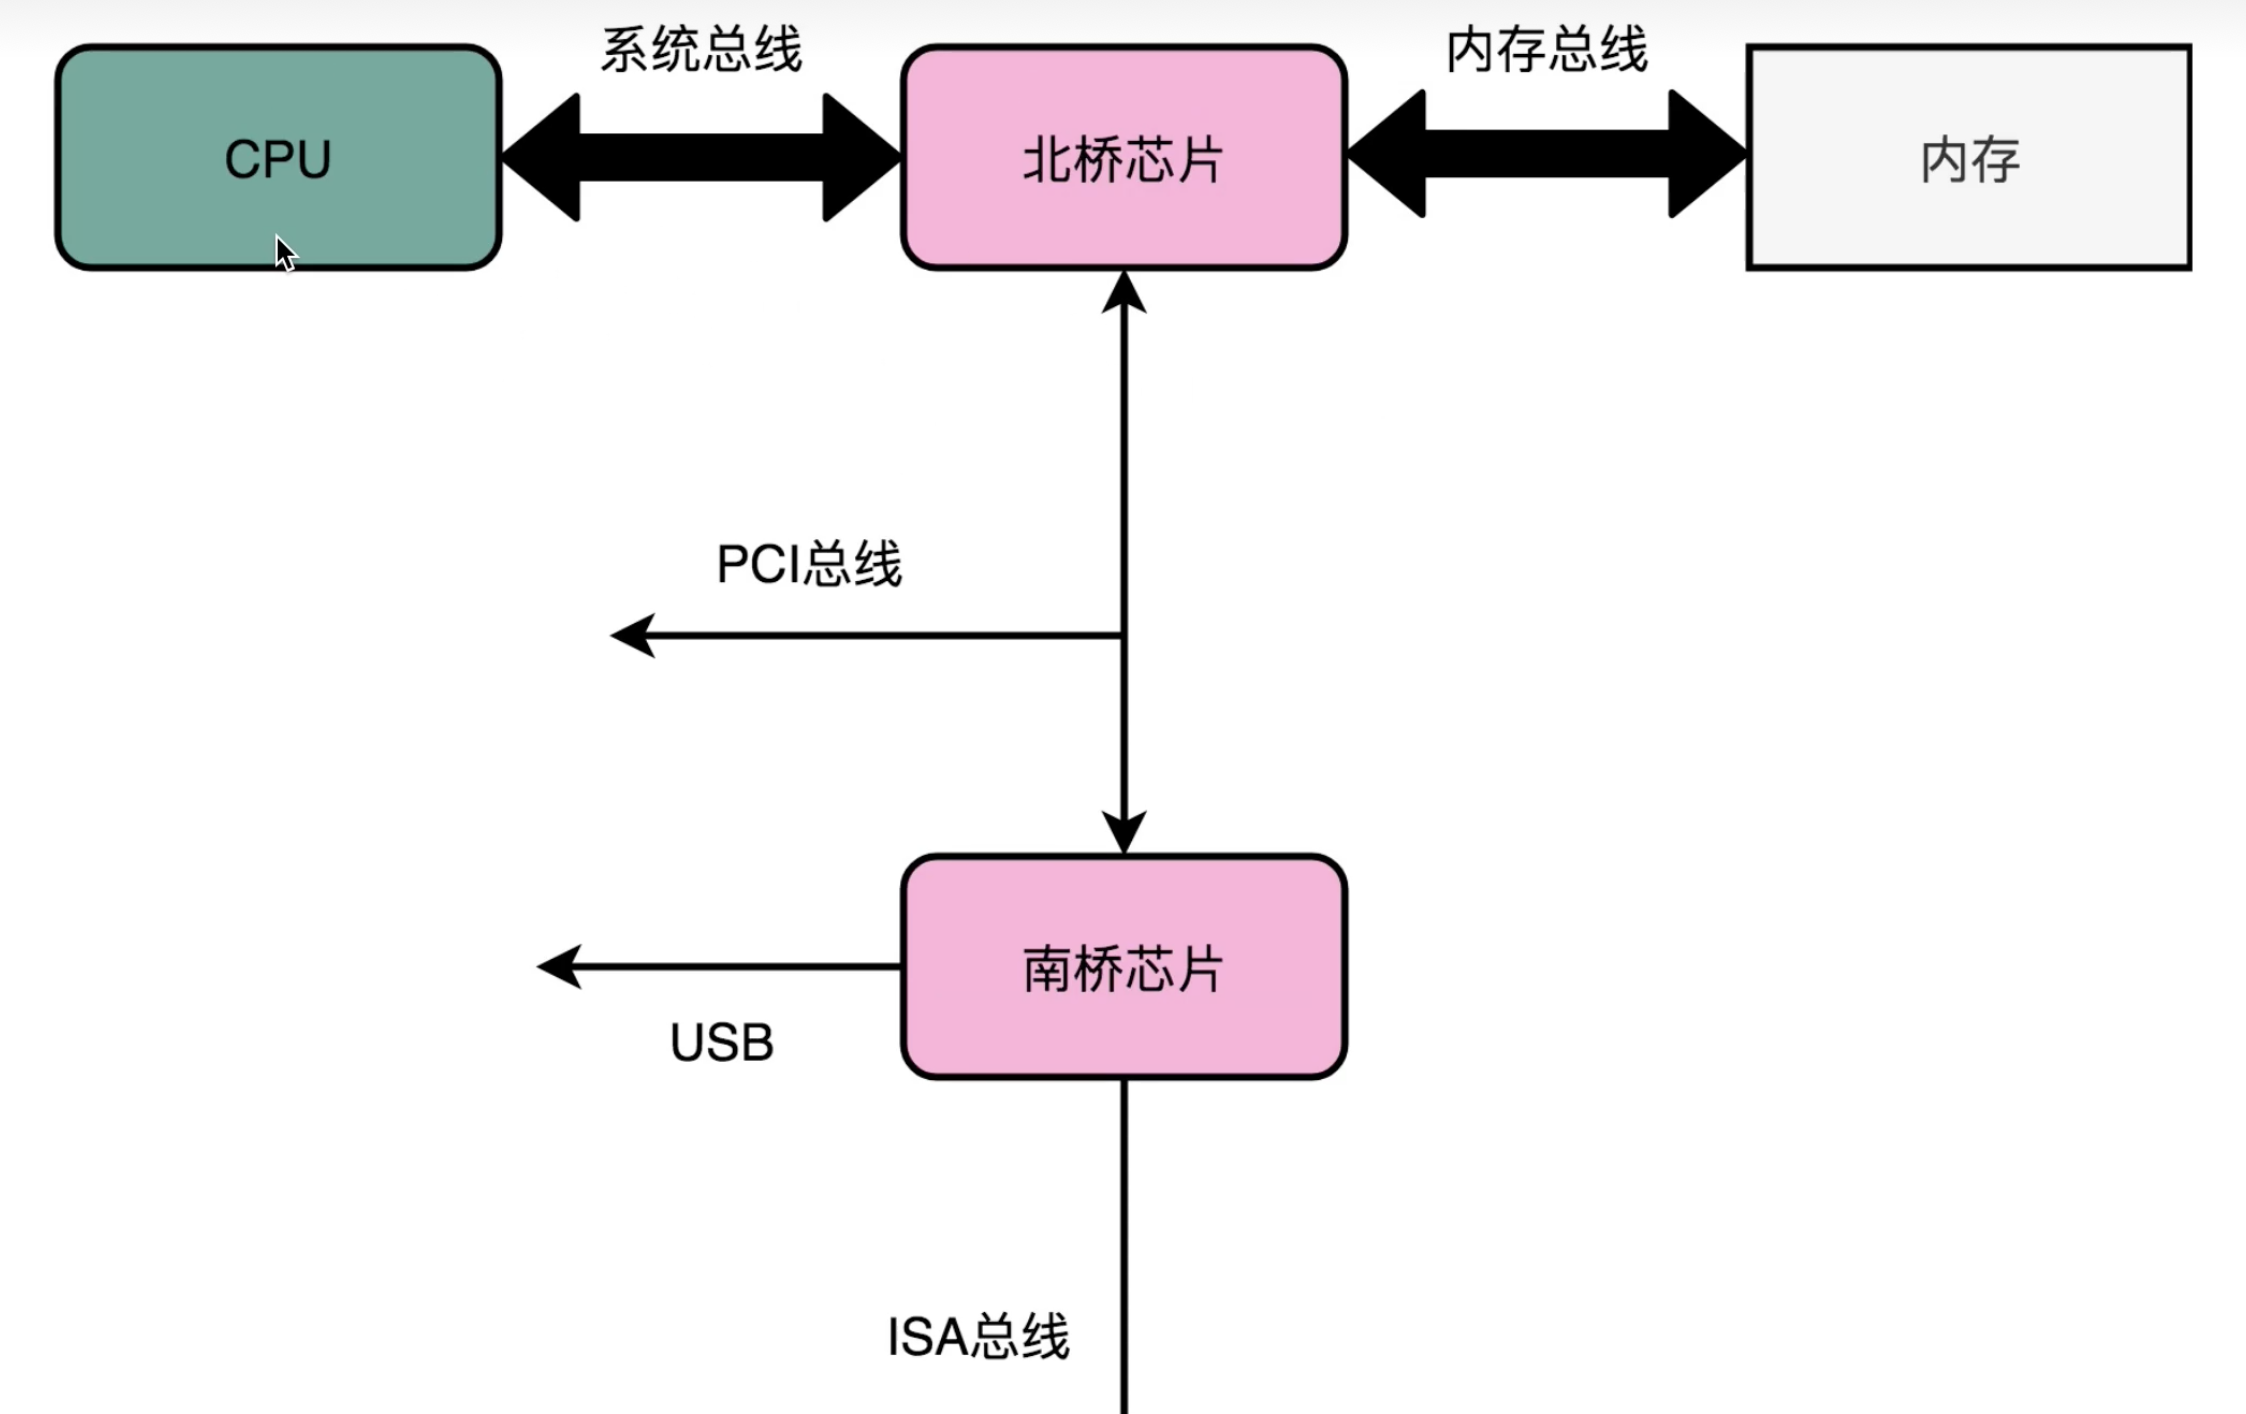 常见的I/O设备一般是鼠标、键盘这类通过USB进行传输的外设或者是通过Sata接口或是M.2连接的硬盘。一般情况下,这些设备是由CPU发出指令通过南桥芯片间接进行控制,而不是由CPU直接操作。
而我们在程序中,想要读取这些外部连接的I/O设备中的内容,就需要将数据传输到内存中。而需要实现这样的操作,单单凭借一个小的程序是无法做到的,而操作系统(如:Windows/Linux/MacOS)就是专门用于控制和管理计算机硬件和软件资源的软件,我们需要读取一个IO设备的内容时,就可以向操作系统发出请求,由操作系统帮助我们来和底层的硬件交互以完成我们的读取/写入请求。
从读取硬盘文件的角度来说,不同的操作系统有着不同的文件系统(也就是文件在硬盘中的存储排列方式,如Windows就是NTFS、MacOS就是APFS),硬盘只能存储一个个0和1这样的二进制数据,至于0和1如何排列,各自又代表什么意思,就是由操作系统的文件系统来决定的。从网络通信角度来说,网络信号通过网卡等设备翻译为二进制信号,再交给系统进行读取,最后再由操作系统来给到程序。
JDK提供了一套用于IO操作的框架,为了方便我们开发者使用,就定义了一个像水流一样,根据流的传输方向和读取单位,分为字节流InputStream和OutputStream以及字符流Reader和Writer的IO框架,当然,这里的Stream并不是前面集合框架认识的Stream,这里的流指的是数据流,通过流,我们就可以一直从流中读取数据,直到读取到尽头,或是不断向其中写入数据,直到我们写入完成,而这类IO就是我们所说的BIO,
字节流一次读取一个字节,也就是一个byte的大小,而字符流顾名思义,就是一次读取一个字符,也就是一个char的大小(在读取纯文本文件的时候更加适合),有关这两种流,会在后面详细介绍,这个章节我们需要学习16个关键的流。
1 FileInputStream 文件字节流
JAVA 实现对文件的读入输出操作用到的类为 FileInputStream 和 FileOutputStream。
在使用一个文件输入流时,需要进行异常处理, 并且最终要关闭流来完成对资源的释放:
public static void main(String[] args) {
	FileInputStream inputStream = null;
	try {
		inputStream = new FileInputStream("路径");
	} catch (FileNotFoundException e) {
		e.printStackTrace();
	} finally {
		try {
			if(inputStream != null) inputStream.close();
		} catch (IOException e) {
			e.printStackTrace();
		}
	}
}
虽然这样的写法才是最保险的,但是显得过于繁琐了,尤其是finally中再次嵌套了一个try-catch块,因此在JDK1.7新增了try-with-resource语法,用于简化这样的写法(本质上还是和这样的操作一致,只是换了个写法)
public static void main(String[] args) {

    //注意,这种语法只支持实现了AutoCloseable接口的类!
    try(FileInputStream inputStream = new FileInputStream("路径")) {   //直接在try()中定义要在完成之后释放的资源

    } catch (IOException e) {   //这里变成IOException是因为调用close()可能会出现,而FileNotFoundException是继承自IOException的
        e.printStackTrace();
    }
    //无需再编写finally语句块,因为在最后自动帮我们调用了close()
}
1.1 读取
使用read可以直接读取一个字节的数据,注意,流的内容是有限的,读取一个少一个。我们如果想一次性全部读取的话,可以直接使用一个while循环来完成:
public static void main(String[] args) {
    //test.txt:abcd
    try(FileInputStream inputStream = new FileInputStream("test.txt")) {
        int tmp;
        while ((tmp = inputStream.read()) != -1){   //通过while循环来一次性读完内容
            System.out.println((char)tmp);
        }
    }catch (IOException e){
        e.printStackTrace();
    }
}
也可以通过 byte[] 数组来一次性全部读取:
public static void main(String[] args) {
    //test.txt:abcd
    try(FileInputStream inputStream = new FileInputStream("test.txt")) {
        byte[] bytes = new byte[inputStream.available()];   //我们可以提前准备好合适容量的byte数组来存放
        System.out.println(inputStream.read(bytes));   //一次性读取全部内容(返回值是读取的字节数)
        System.out.println(new String(bytes));   //通过String(byte[])构造方法得到字符串
    }catch (IOException e){
        e.printStackTrace();
    }
}使用available方法能查看当前可读的剩余字节数量(注意:并不一定真实的数据量就是这么多,尤其是在网络I/O操作时,这个方法只能进行一个预估也可以说是暂时能一次性可以读取的数量,当然在磁盘IO下,一般情况都是真实的数据量)
也可以控制要读取数量:
System.out.println(inputStream.read(bytes, 1, 2)); //第二个参数是从给定数组的哪个位置开始放入内容,第三个参数是读取流中的字节数注意:一次性读取同单个读取一样,当没有任何数据可读时,依然会返回-1
通过skip()方法可以跳过指定数量的字节:
public static void main(String[] args) {
    //test.txt:abcd
    try(FileInputStream inputStream = new FileInputStream("test.txt")) {
        System.out.println(inputStream.skip(1));
        System.out.println((char) inputStream.read());   //跳过了一个字节
    }catch (IOException e){
        e.printStackTrace();
    }
}
1.2 输出
替换写入:
public static void main(String[] args) {
    try(FileOutputStream outputStream = new FileOutputStream("output.txt")) {
        outputStream.write('c');   //同read一样,可以直接写入内容
          outputStream.write("lbwnb".getBytes());   //也可以直接写入byte[]
          outputStream.write("lbwnb".getBytes(), 0, 1);  //同上输入流
          outputStream.flush();  //建议在最后执行一次刷新操作(强制写入)来保证数据正确写入到硬盘文件中
    }catch (IOException e){
        e.printStackTrace();
    }
}
追加写入:
public static void main(String[] args) {
    try(FileOutputStream outputStream = new FileOutputStream("output.txt", true)) {  //true表示开启追加模式
        outputStream.write("lb".getBytes());   //现在只会进行追加写入,而不是直接替换原文件内容
        outputStream.flush();
    }catch (IOException e){
        e.printStackTrace();
    }
}
1.3 应用
文件的拷贝:
public static void main(String[] args) {
	try(FileOutputStream outputStream = new FileOutputStream("output.txt");
		FileInputStream inputStream = new FileInputStream("test.txt")) {
		byte[] bytes = new byte[10];
		int tmp;
		while((temp = inputStream.read(bytes)) != -1) {
			outputStream.write(bytes, 0, tmp);
		}
	}
}
2 FileReader 文件字符流
字符流不同于字节,字符流是以一个具体的字符进行读取,因此它只适合读纯文本的文件,如果是其他类型的文件不适用:
public static void main(String[] args) {
    try(FileReader reader = new FileReader("test.txt")){
          reader.skip(1);   //现在跳过的是一个字符
        System.out.println((char) reader.read());   //现在是按字符进行读取,而不是字节,因此可以直接读取到中文字符
    }catch (IOException e){
        e.printStackTrace();
    }
}同理,字符流只支持char[]类型作为存储:
public static void main(String[] args) {
    try(FileReader reader = new FileReader("test.txt")){
        char[] str = new char[10];
        reader.read(str);
        System.out.println(str);   //直接读取到char[]中
    }catch (IOException e){
        e.printStackTrace();
    }
}
既然有了Reader肯定也有Writer:
public static void main(String[] args) {
    try(FileWriter writer = new FileWriter("output.txt")){
          writer.getEncoding();   //支持获取编码(不同的文本文件可能会有不同的编码类型)
       writer.write('牛');
       writer.append('牛');   //其实功能和write一样
          writer.flush();   //刷新
    }catch (IOException e){
        e.printStackTrace();
    }
}我们发现不仅有write()方法,还有一个append()方法,但是实际上他们效果是一样的,看源码:
public Writer append(char c) throws IOException {
    write(c);
    return this;
}
append支持像StringBuilder那样的链式调用,返回的是Writer对象本身。
3 File 文件类
专门用于表示一个文件或文件夹,只不过它只是代表这个文件,但并不是这个文件本身。通过File对象,可以更好地管理和操作硬盘上的文件。
public static void main(String[] args) {
    File file = new File("test.txt");   //直接创建文件对象,可以是相对路径,也可以是绝对路径
    System.out.println(file.exists());   //此文件是否存在
    System.out.println(file.length());   //获取文件的大小
    System.out.println(file.isDirectory());   //是否为一个文件夹
    System.out.println(file.canRead());   //是否可读
    System.out.println(file.canWrite());   //是否可写
    System.out.println(file.canExecute());   //是否可执行
}
通过File对象,我们就能快速得到文件的所有信息,如果是文件夹,还可以获取文件夹内部的文件列表等内容:
File file = new File("/");
System.out.println(Arrays.toString(file.list()));   //快速获取文件夹下的文件名称列表
for (File f : file.listFiles()){   //所有子文件的File对象
    System.out.println(f.getAbsolutePath());   //获取文件的绝对路径
}
如果我们希望读取某个文件的内容,可以直接将File作为参数传入字节流或是字符流:
File file = new File("test.txt");
try (FileInputStream inputStream = new FileInputStream(file)){   //直接做参数
    System.out.println(inputStream.available());
}catch (IOException e){
    e.printStackTrace();
}
4 缓冲流
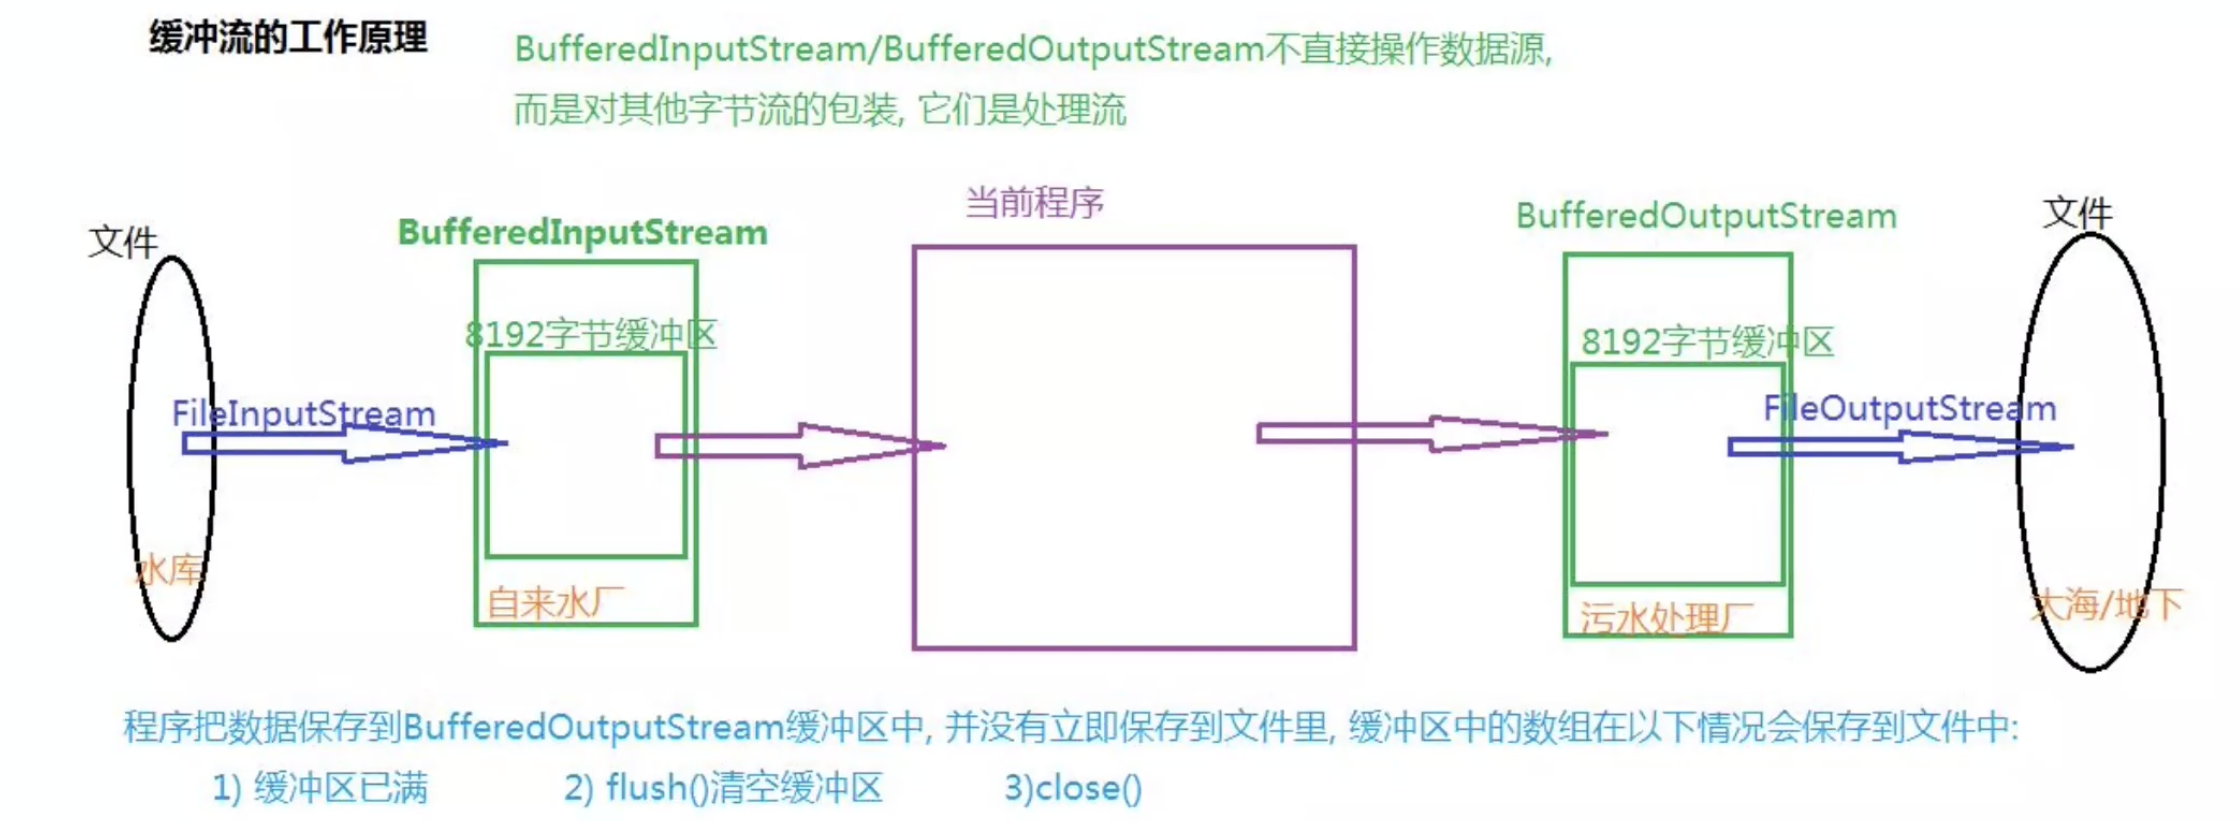
外部I/O设备的速度一般都达不到内存的读取速度,很有可能造成程序反应迟钝,因此性能还不够高,而缓冲流正如其名称一样,它能够提供一个缓冲,提前将部分内容存入内存(缓冲区)在下次读取时,如果缓冲区中存在此数据,则无需再去请求外部设备。同理,当向外部设备写入数据时,也是由缓冲区处理,而不是直接向外部设备写入。
缓冲字节流的创建:
public static void main(String[] args) {
    try (BufferedInputStream bufferedInputStream = new BufferedInputStream(new FileInputStream("test.txt"))){   //传入FileInputStream
        System.out.println((char) bufferedInputStream.read());   //操作和原来的流是一样的
    }catch (IOException e){
        e.printStackTrace();
    }
}实际上进行I/O操作的并不是BufferedInputStream,而是我们传入的FileInputStream,而BufferedInputStream虽然有着同样的方法,但是进行了一些额外的处理然后再调用FileInputStream的同名方法,这样的写法称为装饰者模式,我们会在设计模式篇中详细介绍。
I/O操作一般不能重复读取内容(比如键盘发送的信号,主机接收了就没了),而缓冲流提供了缓冲机制,一部分内容可以被暂时保存,BufferedInputStream支持reset()和mark()操作,首先我们来看看mark()方法的介绍:
/**
 * Marks the current position in this input stream. A subsequent
 * call to the <code>reset</code> method repositions this stream at
 * the last marked position so that subsequent reads re-read the same bytes.
 * <p>
 * The <code>readlimit</code> argument tells this input stream to
 * allow that many bytes to be read before the mark position gets
 * invalidated.
 * <p>
 * This method simply performs <code>in.mark(readlimit)</code>.
 *
 * @param   readlimit   the maximum limit of bytes that can be read before
 *                      the mark position becomes invalid.
 * @see     java.io.FilterInputStream#in
 * @see     java.io.FilterInputStream#reset()
 */
public synchronized void mark(int readlimit) {
    in.mark(readlimit);
}当调用mark()之后,输入流会以某种方式保留之后读取的readlimit数量的内容,当读取的内容数量超过readlimit则之后的内容不会被保留,当调用reset()之后,会使得当前的读取位置回到mark()调用时的位置。
其实mark()后保存的读取内容是取readlimit和BufferedInputStream类的缓冲区大小两者中的最大值,而并非完全由readlimit确定。因此我们限制一下缓冲区大小,再来观察一下结果:
public static void main(String[] args) {
    try (BufferedInputStream bufferedInputStream = new BufferedInputStream(new FileInputStream("test.txt"), 1)){  //将缓冲区大小设置为1
        bufferedInputStream.mark(1);   //只保留之后的1个字符
        System.out.println((char) bufferedInputStream.read());
        System.out.println((char) bufferedInputStream.read());   //已经超过了readlimit,继续读取会导致mark失效
        bufferedInputStream.reset();   //mark已经失效,无法reset()
        System.out.println((char) bufferedInputStream.read());
        System.out.println((char) bufferedInputStream.read());
    }catch (IOException e) {
        e.printStackTrace();
    }
}
了解完了BufferedInputStream之后,我们再来看看BufferedOutputStream,其实和BufferedInputStream原理差不多,只是反向操作:
public static void main(String[] args) {
    try (BufferedOutputStream outputStream = new BufferedOutputStream(new FileOutputStream("output.txt"))){
        outputStream.write("lbwnb".getBytes());
        outputStream.flush();
    }catch (IOException e) {
        e.printStackTrace();
    }
}
既然有缓冲字节流,那么肯定也有缓冲字符流,缓冲字符流和缓冲字节流一样,也有一个专门的缓冲区,BufferedReader构造时需要传入一个Reader对象:
public static void main(String[] args) {
    try (BufferedReader reader = new BufferedReader(new FileReader("test.txt"))){
        System.out.println((char) reader.read());
    }catch (IOException e) {
        e.printStackTrace();
    }
}
相比Reader更方便的是,它支持按行读取:
public static void main(String[] args) {
	try(BufferedReader reader = new BufferedReader(new FileReader("test.txt"))) {
		System.out.println(reader.readline());
	} catch (IOException e) {
		e.printStackTrace();
	}
}
读取后直接得到一个字符串,当然,它还能把每一行内容依次转换为集合类提到的Stream流:
public static void main(String[] args) {
    try (BufferedReader reader = new BufferedReader(new FileReader("test.txt"))){
        reader
                .lines()
                .limit(2)
                .distinct()
                .sorted()
                .forEach(System.out::println);
    }catch (IOException e) {
        e.printStackTrace();
    }
}它同样也支持mark()和reset()操作:
public static void main(String[] args) {
    try (BufferedReader reader = new BufferedReader(new FileReader("test.txt"))){
        reader.mark(1);
        System.out.println((char) reader.read());
        reader.reset();
        System.out.println((char) reader.read());
    }catch (IOException e) {
        e.printStackTrace();
    }
}
5 转换流
有时会遇到这样一个很麻烦的问题:我这里读取的是一个字符串或是一个个字符,但是我只能往一个OutputStream里输出,但是OutputStream又只支持byte类型,如果要往里面写入内容,进行数据转换就会很麻烦,那么能否有更加简便的方式来做这样的事情呢?
public static void main(String[] args) {
    try(OutputStreamWriter writer = new OutputStreamWriter(new FileOutputStream("test.txt"))){  //虽然给定的是FileOutputStream,但是现在支持以Writer的方式进行写入
        writer.write("lbwnb");   //以操作Writer的样子写入OutputStream
    }catch (IOException e){
        e.printStackTrace();
    }
}
同样的,我们现在只拿到了一个InputStream,但是我们希望能够按字符的方式读取,我们就可以使用InputStreamReader来帮助我们实现:
public static void main(String[] args) {
    try(InputStreamReader reader = new InputStreamReader(new FileInputStream("test.txt"))){  //虽然给定的是FileInputStream,但是现在支持以Reader的方式进行读取
        System.out.println((char) reader.read());
    }catch (IOException e){
        e.printStackTrace();
    }
}
InputStreamReader和OutputStreamWriter本质也是Reader和Writer,因此可以直接放入BufferedReader来实现更加方便的操作。
6 打印流
打印流其实我们从一开始就在使用了,比如System.out就是一个PrintStream,PrintStream也继承自FilterOutputStream类因此依然是装饰我们传入的输出流,但是它存在自动刷新机制,例如当向PrintStream流中写入一个字节数组后自动调用flush()方法。PrintStream也永远不会抛出异常,而是使用内部检查机制checkError()方法进行错误检查。最方便的是,它能够格式化任意的类型,将它们以字符串的形式写入到输出流。